My finished piece ... tutorial follows below - lots of pictures for y'all!!!
What inspired this project ... yep, again Pinterest to the rescue. Oh my goodies, I love Pinterest y'all. Took me forever to get into it and now I am just overwhelmed with ideas to make stuff. ha ha
What you need to create my version -
*Foam core board (I had this on hand so that is what I used - really anything would work - wood, canvas, backer board from a picture frame, cardboard, even a piece of poster board would work). I like to use what I have on hand and recycle. :)
*Mod podge or homemade "mod podge" - equal parts Elmer's glue / water & mix well
*tissue paper (mine was left over and had glitter on it - Dollar Tree purchase)
*scraps of fabric or large enough pieces to cut up at the size you need
*piece of paper to make your circle template
*paint brush or whatever you want to use to spread out the "mod podge"
*sharpie - I used a black one
*acrylic paint - I used 8 shades I had on hand from other projects we have done - baby pink, citron green, bright orange, turquoise blue, bright yellow, white, purple cow, royal Fuchsia - all are Americana brand
To get started -
This tutorial is picture heavy ... LOTS of PICTURES!!! :)
Yes that paint brush is rough looking ... it is one of my kids ... perfect for a project like this. :)
I ended up tearing them into roughly 4x4 to 6x6 or so - not exact of course. Heck most wear in crazy shapes. But that makes it more interesting ... you will see as you "glue" them down.
You can make your own by mixing equal parts Elmer's glue & water.
Cheaper and just as good. Works wonderfully.
After you cover the whole board you can go back and either cut the extra off, tear it off, or do what I did and "glue" it down as well.
You can just add more as you go if you didn't cover a large enough surface for your piece of tissue paper.
I didn't bother washing my fabrics before hand or ironing them. There was no bleeding from the "glue" and the wrinkles went out as I pressed the fabric down onto the "glue".
There is no need to put "glue" on top of the fabric unless you want to just to do it.
I didn't photo the following steps but I will explain them ...
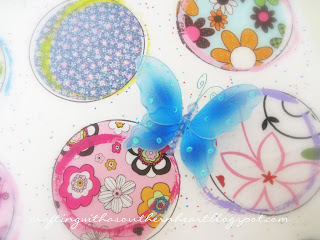
*After I "glued" them all down I then took another lid I found that was slightly larger than the fabric circles - maybe only 1/4" to 1/2" larger (didn't measure it) - I laid it down on top of the fabric circles - not perfectly centered as you can see, but each one slightly different and used a sharpie in black and traced around it. Doesn't have to be perfectly traced ... mine aren't.
*Next I took a smaller paint brush and dipped the tip into the shade of paint I wanted to use and painted a random shaped circle around each one. DO NOT BE PERFECT. IT isn't meant to be. This step can be hard for some ... hahaha - I like things to be perfect, so it was hard for me. Not to make the crazy imperfect circles, but not to go back and fill them in where the paint ran out. ha ha, no kidding it was killing me. But on some you may need to, but don't fill in completely ... you can see how mine are.
*I wanted more at this point, so I laid out some crochet flowers, then some satin blossoms ... but neither was giving me the look I was after. So then I saw a stack of butterflies she had handed me that afternoon - literally. She was cleaning her closet and came across them. They were bought at Hobby Lobby a few years ago to do something with and I guess we obviously never used them. :)
So this was perfect ... more Blooming Butterflies RIGHT!
So then I laid them out and got a look I liked and hot glued them down. I really tried to do this step randomly but I was having a very hard time with that. So as you can see I ended up with an X form. I think this step took me the longest. ha ha ha
A few more photos for y'all to look at ...
We haven't hung it yet, going to get the hubs to discover the best way to do that. Thinking I will attach some ribbon to the back and hang it from a ribbon bow. Will show pictures when I get this step finished. For now it is propted up on a stand in her room.
I hope you enjoyed this project. Get inspired and create one of your own.
Would love to hear from you and see how yours worked out.
you can comment below or email me - craftingwithasouthernheart.blogspot.com
you can comment below or email me - craftingwithasouthernheart.blogspot.com
Wishing y'all a beautiful day.
May God bless all y'alls hearts.
J-me


No comments:
Post a Comment